
PORTRAYING LEAVES WITH V-RAY FOR 3DS MAX –
With endless duplications and unique identifaction, the natural world is one of the most delicate subjects to emulate in the realm of 3D imagery. Then, 3DsMax Course in Pune dissects the nuances of trees in the 3D terrain, and the stylish ways to capture their craft using V-Ray for 3ds Max.
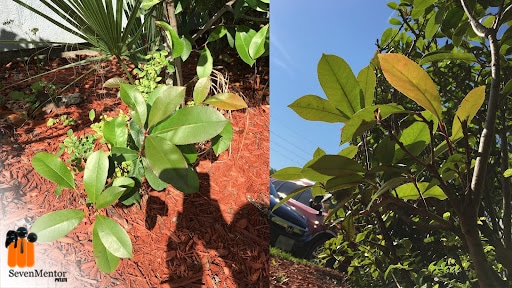
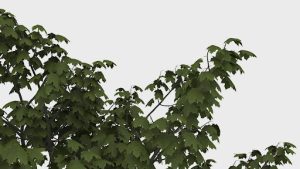
Each object in our natural terrain is defined by unique characteristics. As 3D artists, we must study these rudiments nearly or our digital delineations will be inaccurate. Below are two prints I took to punctuate the complications of colorful leaves.

On the left image, the top side of the leaves are more smooth and reflective, like plastic. On the right we see the underpart, which is further matte in reflection and softer, like fabric. As light shines on each splint, these parcels are stressed. When lit from before, the leaves disperse light like a stained- glass window. Now, let’s see how these characteristics restate to V-Ray with the help of 3DsMax Classes in Pune.
For Free, Demo classes Call: 9172939402
Registration Link: Click Here!
The most difficult element unique to leaves is the way they react to light. Mimicking this type property in V-Ray can be achieved in two ways:
- VRayMtl
- VRay2SidedMtl
VRayMtl –
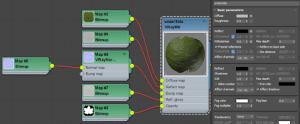
The first approach simply uses one material to achieve the asked effect. For our material, we’ve six charts driving the following parameters Diffuse, Reflection, Reflection Glossiness, Bump, Nebulosity * and Translucence. These parameters are like utmost other accoutrements, away from the Translucence element, so we ’ll focus on that.
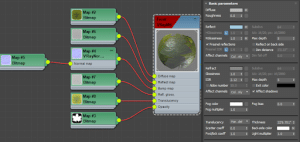
There must be a certain quantum of refraction taking place for translucence to work, else conforming it does nothing. Generally, I’ll use Hard (wax) model for translucence. For the Consistence, the dereliction is around 80’but I lowered it closer to 30’. For the reverse- side color, it’s driven by an image chart that’s a lighter interpretation of the verbose chart.
For this effect to rightly work, the subject (in this case a splint) needs to have volume or thickness. However, also translucence won’t work rightly as it’s grounded on refraction, If this material is applied to a aero plane.
The strike to this system, especially if you’re applying it to foliage, is that you’ll probably have hundreds of thousands of leaves in your scene. Having your leaves on boxes rather of aero planes will increase your polycount by six times! Let’s look at another result that favors aero planes rather than volumes.
* To speed picture times, especially for scenes with numerous trees and objects with nebulosity charts, set the Nebulosity mode to “ Clip” under Options for the VrayMtl. This is an frequently- overlooked setting but can dramatically speed up rendering time
VRay2SidedMtl –
This material is used more frequently to produce translucent goods through thin objects similar as paper, leaves, curtains, etc.
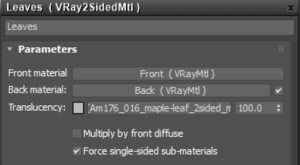
The benefit of this material is its capability to work on aero planes of single polys rather than volumes. The Front and Back accoutrements are defined by the object’s normal.
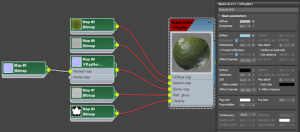
Let’s first look at the Front side material or top side of the leaves. This material is just like our former material, but now refraction and translucence aren’t used, with their values set to black and none independently.
Applied to the leaves in this veritably general lighting script, this material appears with the anticipated parcels.

Now let’s look at the Back material or underpart of the leaves. The setup is no different from the top side, but there’s one major difference the reflection isn’t as current.
Notice how the underpart appears darker than the top side of the leaves. This is because the underpart isn’t reflecting its terrain.
Incipiently, the Front and Back accoutrements are controlled by a Translucence element, generally 50 slate. In this case, we control the Translucence by using a greyscale image chart of the leaves where the modes are darker than the splint itself. When we turn the sun back on, we see the result as follows –

For Free, Demo classes Call: 9172939402
Registration Link: Click Here!
Grass – VrayFur –
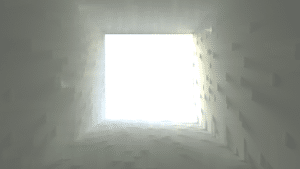
Now let’s look at using VrayFur to produce the same translucent effect on lawn. This image is a immediate of VrayFur with simple green VrayMtl applied to it.
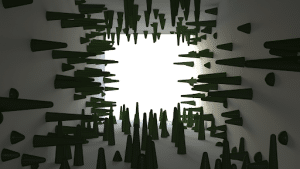
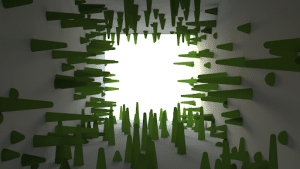
To produce translucence effect, your inclination may be to apply a Vray2SidedMtl to the fur, but this would render incorrect results and increase render times. Below are the result of applying Vray2SidedMtl to VrayFur. It creates intriguing but inaccurate results. Note that if you’re rendering lawn using figure of single sided aeroplanes, this system would work just like the leaves of trees.
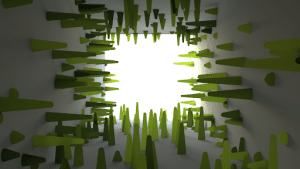
To render translucence rightly on VrayFur, the VRayHairMtl must be used. The below image is created by simply applying a VRayHairMtl and assigning the same green color to Transmission belt.
We can go one step further and produce variation in the color of the beaches by applying the VRayHairInfoTex chart into the Transmission niche. You can change the affair to position color from A to B along the beachfront. In this case, I switched it to Random by beachfront indicator, which creates a arbitrary color for each beachfront between color A and colorB.

The result of applying VrayHairInfoTex to the transmission parameter creates a variation of color for the beaches.
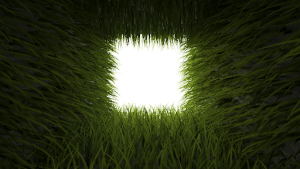
Now simply increasing the taper and distribution, and adding a bend to the VrayFur gives the expected and desired results.
With just a many tools and ways, growing virtual shops with V-Ray is a straightforward process that delivers impeccable results. Learn more at 3DsMax Training in Pune
For Free, Demo classes Call: 9172939402
Registration Link: Click Here!
Happy rendering!
Author:-
Ajinkya Bhosale
© Copyright 2021 | Sevenmentor Pvt Ltd.
Call the Trainer and Book your free demo Class Call now!!!
| SevenMentor Pvt Ltd.