
Spring MVC-
Getting started with Spring MVC –
Spring’s MVC framework can be thought of as tricky or like a mousetrap at first glance. Instead of moving a ball around though ramps, teeter-totters, and wheels, Spring moves requests around between a dispatcher servlet, handler mappings, controllers and view resolvers.
On clicking a link or submitting a form in the user web browser, a request goes to work. It works as a courier. You can resemble it to a postal carrier or a FedEx delivery person. Job of request is to carry information from one place to another.
The request is a busy fellow. It works from the time it leaves the browser until it returns with a response. It has to make several stops, each time dropping off a bit of information and picking up some more.
For Free, Demo classes Call: 8237077325
Registration Link: Click Here!
After the request leaves the browser, it carries information about what the user is asking for. The request has a requested URL. Along with this it will also carry additional data such as the information submitted in a form by the user.
Request goes first to the Spring’s Dispatcher Servlet. Spring MVC searches requests through a single front controller servlet. Front controller is always a common web application pattern where a single servlet delegates responsibility for a request to other components of an application to perform actual processing. Front controller in Spring MVC is Dispatcher Servlet..
Request is sent to the Spring MVC controller by the Dispatcher Servlet . In spring MVC the request is processed by a controller that is a Spring. But a typical application may have several controllers and Dispatcher Servlet consults one or more handler mappings to figure out where the request’s next stop will be. The role of handler mapping is to pay attention to the URL carried by the request when making its decision.
After choosing an appropriate controller, Dispatcher Servlet sends the request on its merry way to the chosen controller.
At the heart of Spring MVC is Dispatcher Servlet, a servlet that functions as Spring MVC’s front controller. Like any servlet, Dispatcher Servlet must be configured in the web applications web.xml file.
For Free, Demo classes Call: 8237077325
Registration Link: Click Here!
<servlet>declaration in the web.xml file.
<servlet>
<servlet-name>spring</servlet-name>
<servlet-class>org.springframework.web.servlet.DispatcherServlet</servlet-class>
<load-on-startup>1</load-on-startup>
</servlet>
<servlet-mapping>
<servlet-name>spring</servlet-name>
<url-pattern>/</url-pattern>
</servlet-mapping>
The <servlet-name> given to the servlet is significant. By default, when Dispatcher-Servlet is loaded. It will load the Spring application context from an XML file, whose name is based on the name of the servlet. In this case, because the servlet is named spring, Dispatcher Servlet will try to load the application context from a file named spring-servlet.xml( located in the applications WEB-INF directory).
Next we must indicate that URLs will be handled by the Dispatcher Servlet. It’s common to find a Dispatcher Servlet mapped to URL patterns such as “/” .
So now lets create spring-servlet.xml that Dispatcher Servlet will use to create an application context.
<?xml version=”1.0″ encoding=”UTF-8″?>
<beans
xsi:schemaLocation=” http://www.springframework.org/schema/beans
http://www.springframework.org/schema/beans/spring-beans.xsd
http://www.springframework.org/schema/context
http://www.springframework.org/schema/context/spring-context.xsd
http://www.springframework.org/schema/mvc
http://www.springframework.org/schema/mvc/spring-mvc.xsd”
xmlns:mvc=”http://www.springframework.org/schema/mvc”
xmlns:context=”http://www.springframework.org/schema/context”
xmlns:xsi=”http://www.w3.org/2001/XMLSchema-instance”
xmlns=”http://www.springframework.org/schema/beans”>
<mvc:annotation-driven/>
<context:component-scan base-package=”com.org”/>
</beans>
So as stated earlier, all requests that go through Dispatcher Servlet must be handled in some way, commonly via controllers. Since requests for static content are also being handled by Dispatcher Servlet, we’re going to need some way to tell Dispatcher Servlet how to serve those resources.
Writing a basic Controller –
As we develop the web functionality for the spring application, we’re going to develop resource oriented controllers.
In addition to controllers for each of the application’s core concepts, we also have two other utility controllers. These controllers handle a few requests that are necessary, but don’t directly map to a specific concept.
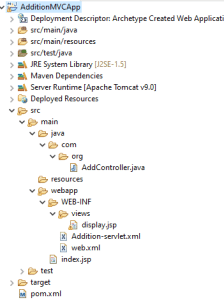
Following is the MVC project that will demonstrate the addition of two numbers.
This should be the project structure –
Pom.xml
<project xmlns=”http://maven.apache.org/POM/4.0.0″ xmlns:xsi=”http://www.w3.org/2001/XMLSchema-instance”
xsi:schemaLocation=”http://maven.apache.org/POM/4.0.0 http://maven.apache.org/maven-v4_0_0.xsd”>
<modelVersion>4.0.0</modelVersion>
<groupId>com.org</groupId>
<artifactId>AdditionMVCApp</artifactId>
<packaging>war</packaging>
<version>0.0.1-SNAPSHOT</version>
<name>AdditionMVCApp Maven Webapp</name>
<url>http://maven.apache.org</url>
<dependencies>
<dependency>
<groupId>junit</groupId>
<artifactId>junit</artifactId>
<version>3.8.1</version>
<scope>test</scope>
</dependency>
<dependency>
<groupId>org.springframework</groupId>
<artifactId>spring-webmvc</artifactId>
<version>5.3.9</version>
</dependency>
</dependencies>
<build>
<plugins>
<plugin>
<groupId>org.apache.maven.plugins</groupId>
<artifactId>maven-war-plugin</artifactId>
<version>3.3.1</version>
</plugin>
</plugins>
<finalName>AdditionMVCApp</finalName>
</build>
</project>
Index.jsp
<html>
<body>
<form action=”add”>
Enter First Number := <input type=”number” name=”n1″><br>
Enter Second Number := <input type=”number” name=”n2″><br>
<button type=”submit”>Add</button>
</form>
</body>
</html>
Web.xml
<!DOCTYPE web-app PUBLIC
“-//Sun Microsystems, Inc.//DTD Web Application 2.3//EN”
“http://java.sun.com/dtd/web-app_2_3.dtd” >
<web-app>
<display-name>Archetype Created Web Application</display-name>
<servlet>
<servlet-name>Addition</servlet-name>
<servlet-class>org.springframework.web.servlet.DispatcherServlet</servlet-class>
</servlet>
<servlet-mapping>
<servlet-name>Addition</servlet-name>
<url-pattern>/</url-pattern>
</servlet-mapping>
</web-app>
For Free, Demo classes Call: 8237077325
Registration Link: Click Here!
Spring-servlet.xml
<?xml version=”1.0″ encoding=”UTF-8″?>
<beans
xsi:schemaLocation=” http://www.springframework.org/schema/beans
http://www.springframework.org/schema/beans/spring-beans.xsd
http://www.springframework.org/schema/context
http://www.springframework.org/schema/context/spring-context.xsd
http://www.springframework.org/schema/mvc
http://www.springframework.org/schema/mvc/spring-mvc.xsd”
xmlns:mvc=”http://www.springframework.org/schema/mvc”
xmlns:context=”http://www.springframework.org/schema/context”
xmlns:xsi=”http://www.w3.org/2001/XMLSchema-instance”
xmlns=”http://www.springframework.org/schema/beans”>
<mvc:annotation-driven/>
<context:component-scan base-package=”com.org”/>
<bean id=”viewResolver” class=”org.springframework.web.servlet.view.InternalResourceViewResolver”>
<property name=”prefix” value=”/WEB-INF/views/”></property>
<property name=”suffix” value=”.jsp”></property>
</bean>
</beans>
HomeController.java
package com.org;
import javax.servlet.http.HttpServletRequest;
import javax.servlet.http.HttpServletResponse;
import org.springframework.stereotype.Controller;
import org.springframework.web.bind.annotation.RequestMapping;
import org.springframework.web.servlet.ModelAndView;
@Controller
public class AddController {
@RequestMapping(“/add”)
public ModelAndView show(HttpServletRequest request,HttpServletResponse response) {
int n1=Integer.parseInt(request.getParameter(“n1”));
int n2=Integer.parseInt(request.getParameter(“n2”));
int res=n1+n2;
ModelAndView mv=new ModelAndView();
mv.setViewName(“display”);
mv.addObject(“Result”, res);
return mv;
}
}
Display.jsp
<%@ page language=”java” contentType=”text/html; charset=ISO-8859-1″
pageEncoding=”ISO-8859-1″%>
<%@page isELIgnored=”false” %>
<!DOCTYPE html>
<html>
<head>
<meta charset=”ISO-8859-1″>
<title>Insert title here</title>
</head>
<body>
<h1>Addition is <%=request.getAttribute(“Result”) %></h1><br>
<h1>Addition is := ${Result}</h1>
</body>
</html>
Author:-
Jyostna Binjwe
Call the Trainer and Book your free demo Class Call now!!!
| SevenMentor Pvt Ltd.
© Copyright 2021 | Sevenmentor Pvt Ltd.